ฉันจะจัดมุมมองที่ด้านล่างของหน้าจอได้อย่างไร


635

นี่คือรหัสรูปแบบของฉัน

<?xml version="1.0" encoding="utf-8"?>
<LinearLayout xmlns:android="http://schemas.android.com/apk/res/android"
    android:orientation="vertical"
    android:layout_width="fill_parent"
    android:layout_height="fill_parent">

    <TextView android:text="@string/welcome"
        android:id="@+id/TextView"
        android:layout_width="fill_parent"
        android:layout_height="wrap_content">
    </TextView>

    <LinearLayout android:id="@+id/LinearLayout"
        android:orientation="horizontal"
        android:layout_width="wrap_content"
        android:layout_height="wrap_content"
        android:gravity="bottom">

            <EditText android:id="@+id/EditText"
                android:layout_width="fill_parent"
                android:layout_height="wrap_content">
            </EditText>

            <Button android:text="@string/label_submit_button"
                android:id="@+id/Button"
                android:layout_width="wrap_content"
                android:layout_height="wrap_content">
            </Button>

    </LinearLayout>

</LinearLayout>

สิ่งนี้ดูเหมือนว่าอยู่ทางซ้ายและสิ่งที่ฉันต้องการให้ดูเหมือนอยู่ทางขวา

เค้าโครง Android - จริง (ซ้าย) และที่ต้องการ (ขวา)

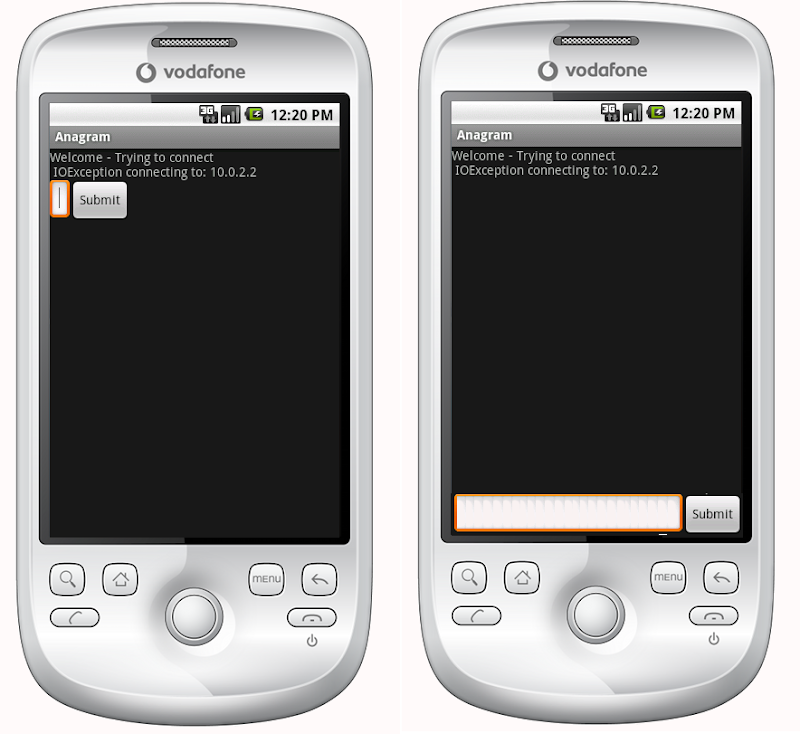
คำตอบที่ชัดเจนคือการตั้งค่า TextView ให้ fill_parent บนความสูง แต่สิ่งนี้ทำให้ไม่มีที่ว่างเหลือสำหรับปุ่มหรือฟิลด์รายการ

โดยพื้นฐานแล้วปัญหาคือฉันต้องการให้ปุ่มส่งและรายการข้อความเป็นความสูงคงที่ที่ด้านล่างและมุมมองข้อความเพื่อเติมเต็มพื้นที่ที่เหลือ ในทำนองเดียวกันในเลย์เอาต์แบบเส้นแนวนอนฉันต้องการให้ปุ่มส่งเพื่อตัดเนื้อหาและสำหรับการป้อนข้อความเพื่อเติมส่วนที่เหลือของพื้นที่

หากรายการแรกในเลย์เอาต์แบบเส้นถูกบอกให้เติม _parent มันจะทำสิ่งนั้นอย่างแน่นอนทำให้ไม่มีที่ว่างสำหรับรายการอื่น ฉันจะรับไอเท็มที่อยู่ในเลย์เอาต์เชิงเส้นก่อนเพื่อเติมช่องว่างทั้งหมดนอกเหนือจากค่าต่ำสุดที่จำเป็นสำหรับรายการที่เหลือในเลย์เอาต์ได้อย่างไร


รูปแบบสัมพัทธ์เป็นคำตอบที่แน่นอน:

    <?xml version="1.0" encoding="utf-8"?>
    <RelativeLayout
    xmlns:android="http://schemas.android.com/apk/res/android"
    android:layout_width="fill_parent"
    android:layout_height="fill_parent">

    <TextView
        android:text="@string/welcome"
        android:id="@+id/TextView"
        android:layout_width="fill_parent"
        android:layout_height="wrap_content"
        android:layout_alignParentTop="true">
    </TextView>

    <RelativeLayout
        android:id="@+id/InnerRelativeLayout"
        android:layout_width="wrap_content"
        android:layout_height="wrap_content"
        android:layout_alignParentBottom="true" >

        <Button
            android:text="@string/label_submit_button"
            android:id="@+id/Button"
            android:layout_alignParentRight="true"
            android:layout_width="wrap_content"
            android:layout_height="wrap_content">
        </Button>

        <EditText
            android:id="@+id/EditText"
            android:layout_width="fill_parent"
            android:layout_toLeftOf="@id/Button"
            android:layout_height="wrap_content">
        </EditText>

    </RelativeLayout>

</RelativeLayout>

7
@oneelf Paint;) ฉันกำลังใช้สกินบนตัวจำลองแม้ว่าจะได้รับความอนุเคราะห์จาก Tea Vui Huang teavuihuang.com/android
gav

14
+1 สำหรับการโพสต์เค้าโครง XML ที่แก้ไข ช่วยฉันคิดออกว่าเกิดอะไรขึ้นกับฉัน
Howler

คำตอบ:


526

วิธีที่ทันสมัยในการทำเช่นนี้คือการมีข้อ จำกัด เค้าโครงและ จำกัด ด้านล่างของมุมมองไปด้านล่างของข้อ จำกัด โครงร่างด้วยapp:layout_constraintBottom_toBottomOf="parent"

ตัวอย่างด้านล่างนี้สร้าง FloatingActionButton ที่จะจัดวางไว้ที่ส่วนท้ายและด้านล่างของหน้าจอ

<android.support.constraint.ConstraintLayout
   xmlns:android="http://schemas.android.com/apk/res/android"
   xmlns:app="http://schemas.android.com/apk/res-auto"
   xmlns:tools="http://schemas.android.com/tools"
   android:layout_height="match_parent"
   android:layout_width="match_parent">

<android.support.design.widget.FloatingActionButton
    android:layout_height="wrap_content"
    android:layout_width="wrap_content"

    app:layout_constraintBottom_toBottomOf="parent"

    app:layout_constraintEnd_toEndOf="parent" />

</android.support.constraint.ConstraintLayout>

สำหรับการอ้างอิงฉันจะเก็บคำตอบเก่าไว้

ก่อนที่จะมีการเปิดตัว ConstraintLayout คำตอบก็คือเค้าโครงที่สัมพันธ์กัน


หากคุณมีเค้าโครงแบบสัมพัทธ์ที่เติมเต็มทั้งหน้าจอคุณควรจะสามารถใช้งานได้ android:layout_alignParentBottomเพื่อย้ายปุ่มไปที่ด้านล่างของหน้าจอ

หากมุมมองของคุณที่ด้านล่างไม่แสดงในเค้าโครงที่สัมพันธ์กันอาจเป็นเค้าโครงด้านบนอาจใช้พื้นที่ทั้งหมด android:layout_aboveในกรณีนี้คุณสามารถใส่มุมมองที่ควรจะเป็นที่ด้านล่างเป็นครั้งแรกในไฟล์รูปแบบของคุณและตำแหน่งส่วนที่เหลือของรูปแบบข้างต้นมุมมองที่มี สิ่งนี้ช่วยให้มุมมองด้านล่างใช้พื้นที่ได้มากเท่าที่ต้องการและเค้าโครงที่เหลือสามารถเติมเต็มส่วนที่เหลือของหน้าจอทั้งหมด


5
FYI: นั่นไม่สามารถใช้งานได้ใน ScrollView นี่คือปัญหาที่ฉันกำลังเผชิญอยู่ในขณะนี้ ดูstackoverflow.com/questions/3126347/…
IgorGanapolsky

6
นั่นคือ ScrollViews และเลย์เอาต์ที่สัมพันธ์กันที่ไม่ถูกต้อง หากคุณมีเนื้อหามากพอที่จะแสดงทุกอย่างในหน้าเดียวให้ใช้ linearlayout และใส่ในมุมมองด้านล่างล่าสุด หากคุณต้องการให้มุมมองปรากฏล่าสุดใน scrollview บนหน้าจอขนาดเล็กและที่ด้านล่างของหน้าบนโทรศัพท์ที่ใหญ่กว่าให้พิจารณาใช้ไฟล์เลย์เอาต์ที่แตกต่างกันและใช้ตัวระบุคุณสมบัติ ressource เพื่อให้อุปกรณ์เลือกไฟล์เลย์เอาต์ที่ถูกต้อง
Janusz

ตกลง .. อะไรคือจุดสำคัญของวรรคสองของคำตอบที่นี่? "คุณควรหาเค้าโครงที่ครอบคลุมส่วนล่างของหน้าจอก่อน" หรือไม่? แล้วเราควรใช้ layout_alignParentBottom ภายในเค้าโครงหรือไม่ เราต้องการandroid:layout_aboveอะไร
eugene

คุณต้องการข้างต้นถ้าคุณต้องการบางสิ่งบางอย่างเช่นแถบที่ด้านล่างแล้ว LinearLayout เหนือแถบนี้ที่ทอดยาวจากด้านบนของหน้าจอไปที่แถบ
Janusz

1
ฉันได้อ่านหนึ่งใน "Android Weekly" that RelativeLayoutคือการใช้หน่วยความจำและควรหลีกเลี่ยงเมื่อใดก็ตามที่เป็นไปได้
Tomasz Mularczyk

153

ในสิ่งScrollViewนี้ไม่ทำงานตามที่RelativeLayoutจะทับซ้อนสิ่งScrollViewที่อยู่ด้านล่างของหน้า

ฉันแก้ไขโดยใช้การยืดแบบไดนามิกFrameLayout:

<ScrollView 
    xmlns:android="http://schemas.android.com/apk/res/android"
    android:layout_height="match_parent" 
    android:layout_width="match_parent"
    android:fillViewport="true">
    <LinearLayout 
        android:id="@+id/LinearLayout01"
        android:layout_width="match_parent" 
        android:layout_height="match_parent"
        xmlns:android="http://schemas.android.com/apk/res/android"
        android:orientation="vertical">

                <!-- content goes here -->

                <!-- stretching frame layout, using layout_weight -->
        <FrameLayout
            android:layout_width="match_parent" 
            android:layout_height="0dp"
            android:layout_weight="1">
        </FrameLayout>

                <!-- content fixated to the bottom of the screen -->
        <LinearLayout 
            android:layout_width="match_parent" 
            android:layout_height="wrap_content"
            android:orientation="horizontal">
                                   <!-- your bottom content -->
        </LinearLayout>
    </LinearLayout>
</ScrollView>

1
นี่เป็นสิ่งที่ยอดเยี่ยมเช่นกันมันเป็น "การบุกรุกน้อยที่สุด" และใช้งานง่ายกว่าวิธี RelativeLayout ฉันจะให้ upvote มากกว่าหนึ่งถ้าทำได้!
manmal

4
ฉันใช้โซลูชันของคุณในแอปพลิเคชันของฉัน แต่ในกรณีของฉันฉันต้องการที่เมื่อแป้นพิมพ์ปรากฏขึ้นปุ่มจะอยู่ที่ด้านล่างของหน้าจอ (ด้านหลังแป้นพิมพ์) มีข้อผิดพลาดหรือไม่? Thaks
Yoann

1
@ DoubleYo: ในรายการหุ่นยนต์: windowSoftInputMode = "adjustPan"
Kopfgeldjaeger

2
หากคุณต้องการให้ด้านล่างถาวรอย่างถาวรเพื่อให้แสดงตลอดเวลาไม่สามารถใช้งานได้ มิฉะนั้นมันจะทำงาน
K - ความเป็นพิษใน SO กำลังเพิ่มขึ้น

72

คุณสามารถเก็บเค้าโครงเชิงเส้นเริ่มต้นของคุณได้โดยวางซ้อนเค้าโครงที่สัมพันธ์กันภายในเค้าโครงเชิงเส้น:

<LinearLayout
    android:orientation="vertical"
    android:layout_width="fill_parent"
    android:layout_height="fill_parent">

    <TextView android:text="welcome" 
        android:id="@+id/TextView" 
        android:layout_width="fill_parent" 
        android:layout_height="wrap_content">
    </TextView>

    <RelativeLayout
        android:layout_width="match_parent"
        android:layout_height="match_parent">
        <Button android:text="submit" 
            android:id="@+id/Button" 
            android:layout_width="wrap_content" 
            android:layout_height="wrap_content"
            android:layout_alignParentBottom="true"
            android:layout_alignParentRight="true">
        </Button>
        <EditText android:id="@+id/EditText" 
            android:layout_width="match_parent" 
            android:layout_height="wrap_content"
            android:layout_toLeftOf="@id/Button"
            android:layout_alignParentBottom="true">
        </EditText>
    </RelativeLayout>
</LinearLayout>

2
นี่เป็นวิธีที่ยุ่งเหยิงเพราะมันไม่ได้เป็นแบบแยกส่วน คุณไม่ควรมีเค้าโครงที่ทับซ้อนกัน การออกแบบนี้จะไม่ทำงานทันทีที่คุณต้องการเปลี่ยนพื้นหลังของ RelativeLayout หรือต้องการทำให้มุมมองใด ๆ ที่ใหญ่ขึ้นหรือเพิ่มมุมมอง
Patrick

42

คำตอบข้างต้น (โดย Janusz) ค่อนข้างถูกต้อง แต่ฉันรู้สึกไม่สบายใจ 100% กับ RelativeLayouts ดังนั้นฉันชอบที่จะแนะนำ 'ฟิลเลอร์' TextView ที่ว่างเปล่าเช่นนี้:

<!-- filler -->
<TextView android:layout_height="0dip" 
          android:layout_width="fill_parent"
          android:layout_weight="1" />

ก่อนองค์ประกอบที่ควรจะอยู่ที่ด้านล่างของหน้าจอ


นี่จะขยายเป็นแกน x หรือ y การให้ความสูง 0dip จะทำให้มุมมองข้อความไม่มีความสูงใด ๆ หรือจะขยายให้มากที่สุดเท่าที่มันจะชอบแกน x
Lukap

สิ่งนี้ขยายในแนวตั้งเนื่องจากความสูง (แกนแนวตั้ง) ถูกตั้งค่าเป็น 0 และน้ำหนักเป็น 1 (สมมติว่าองค์ประกอบอื่นมีน้ำหนักเป็นศูนย์)
Timores

บนแกน x จะเป็นพาเรนต์ (fill_parent)
Timores

แทนที่จะเป็นมุมมองข้อความฉันจะใช้รูปแบบเชิงเส้นอื่น มุมมองเค้าโครงดูเหมือนจะบอกเป็นนัย ๆ ว่าสามารถใช้เติมพื้นที่ได้หรือไม่
ComeIn

33

คุณสามารถทำได้ด้วย LinearLayout หรือ ScrollView เช่นกัน บางครั้งการใช้งานง่ายกว่า RelativeLayout สิ่งเดียวที่คุณต้องทำคือการเพิ่มมุมมองต่อไปนี้ก่อนมุมมองที่คุณต้องการจัดแนวกับด้านล่างของหน้าจอ:

<View
    android:layout_width="wrap_content"
    android:layout_height="0dp"
    android:layout_weight="1" />

สิ่งนี้จะสร้างมุมมองว่างเติมพื้นที่ว่างและผลักดันมุมมองถัดไปที่ด้านล่างของหน้าจอ


27

ยังใช้งานได้

<LinearLayout 
    android:id="@+id/linearLayout4"
    android:layout_width="wrap_content"
    android:layout_height="fill_parent"
    android:layout_below="@+id/linearLayout3"
    android:layout_centerHorizontal="true"
    android:orientation="horizontal" 
    android:gravity="bottom"
    android:layout_alignParentBottom="true"
    android:layout_marginTop="20dp"
>

    <Button
        android:id="@+id/button1"
        android:layout_width="wrap_content"
        android:layout_height="wrap_content"
        android:text="Button" 

    />

    <Button
        android:id="@+id/button2"
        android:layout_width="wrap_content"
        android:layout_height="wrap_content"
        android:text="Button" 


    />

</LinearLayout>

แรงโน้มถ่วง = "ก้น" เพื่อลอยองค์ประกอบ LinearLayout ไปยังด้านล่าง


12
android: layout_alignParentBottom = "true" ไม่มีผลยกเว้นว่า LinearLayout ซ้อนอยู่ภายใน RelativeLayout
Thomas Dignan

คำอธิบายจะเป็นไปตามลำดับ (เช่นการเปลี่ยนแปลงที่สำคัญวิธีการทำงานทำไมมันถึงทำงาน ฯลฯ )
ปีเตอร์มอร์เทนเซ่น

26

1. ใช้ConstraintLayoutในเค้าโครงรูทของคุณ

และตั้งค่าapp:layout_constraintBottom_toBottomOf="parent"ให้เลย์เอาต์ที่ด้านล่างของหน้าจอ:

<LinearLayout
    android:id="@+id/LinearLayout"
    android:layout_width="match_parent"
    android:layout_height="wrap_content"
    android:orientation="horizontal"
    app:layout_constraintBottom_toBottomOf="parent">
</LinearLayout>

2. ใช้FrameLayoutในเค้าโครงรูทของคุณ

เพียงตั้งค่าandroid:layout_gravity="bottom"ในเค้าโครงของคุณ

<LinearLayout
    android:id="@+id/LinearLayout"
    android:layout_width="match_parent"
    android:layout_height="wrap_content"
    android:layout_gravity="bottom"
    android:orientation="horizontal">
</LinearLayout>

3. ใช้LinearLayoutในเค้าโครงรูทของคุณ ( android:orientation="vertical")

(1) ตั้งค่าเลย์เอาต์android:layout_weight="1"ที่ด้านบนของเลย์เอาต์ของคุณ

<TextView
    android:id="@+id/TextView"
    android:layout_width="match_parent"
    android:layout_height="0dp"
    android:layout_weight="1"
    android:text="welcome" />

(2) ตั้งค่าเด็กLinearLayoutสำหรับandroid:layout_width="match_parent" android:layout_height="match_parent" android:gravity="bottom"

แอตทริบิวต์หลักคือndroid:gravity="bottom"ให้ลูกดูที่ด้านล่างของเค้าโครง

<LinearLayout
    android:id="@+id/LinearLayout"
    android:layout_width="match_parent"
    android:layout_height="match_parent"
    android:gravity="bottom"
    android:orientation="horizontal">
</LinearLayout>

4. ใช้RelativeLayoutในเค้าโครงรูท

และตั้งค่าandroid:layout_alignParentBottom="true"ให้เลย์เอาต์ที่ด้านล่างของหน้าจอ

<LinearLayout
    android:id="@+id/LinearLayout"
    android:layout_width="match_parent"
    android:layout_height="wrap_content"
    android:layout_alignParentBottom="true"
    android:orientation="horizontal">
</LinearLayout>

เอาท์พุต

ป้อนคำอธิบายภาพที่นี่


20

การติดตามโซลูชันที่หรูหราของ Timoresฉันได้พบว่าสิ่งต่อไปนี้สร้างการเติมแบบแนวตั้งใน LinearLayout แนวตั้งและการเติมแนวนอนใน LinearLayout แนวนอน:

<Space
    android:layout_width="match_parent"
    android:layout_height="match_parent"
    android:layout_weight="1" />

@sepehr จะต้องมีปัจจัยอีกอย่างหนึ่งในการเล่นในกรณีที่คุณพบว่าโซลูชันของฉันไม่ทำงาน ฉันเพิ่งลองวิธีแก้ปัญหาของฉันในรูปแบบชิ้นส่วนและใช้งานได้เช่นกัน
stevehs17

น้ำหนักได้รับการสนับสนุนในรูปแบบเชิงเส้นและ @sepehr พวกเขาจะทำงานในชิ้นส่วนกิจกรรมการแจ้งเตือนกล่องโต้ตอบเช่นกัน;)
Jan Rabe

16

คุณไม่จำเป็นต้องซ้อนrelativeเค้าโครงที่สองไว้ในเค้าโครงแรก เพียงใช้android:layout_alignParentBottom="true"ในปุ่มและEditText


เพียงแค่ทราบว่าถึงแม้ว่าจะใช้งานได้กับปุ่มและ EditText หากคุณพยายามจัดแนว TableLayout ด้วยวิธีนี้มันจะไม่ทำงาน คุณจะต้องวางมันไว้ใน RelativeLayout อื่น

11

หากคุณไม่ต้องการทำการเปลี่ยนแปลงมากมายคุณสามารถทำสิ่งต่อไปนี้:

android:layout_weight="1"

สำหรับ TextView ที่มี ID @+id/TextViewเช่น

<TextView android:text="@string/welcome" 
    android:id="@+id/TextView" 
    android:layout_width="fill_parent" 
    android:layout_height="wrap_content"
    android:layout_weight="1">
</TextView>

หรือเพิ่ม LinearLayout ที่อยู่ใกล้เคียงกับ Android: layout_weight = "1" - สิ่งนี้ยังทำงานได้ดีภายใน ScrollView!
bk138

7

สร้างทั้งส่วนหัวและส่วนท้ายนี่เป็นตัวอย่าง:

โครงร่าง XML

<RelativeLayout
    xmlns:android="http://schemas.android.com/apk/res/android"
    xmlns:tools="http://schemas.android.com/tools"
    android:layout_width="fill_parent"
    android:layout_height="fill_parent"
    android:background="@color/backgroundcolor"
    tools:context=".MainActivity">

    <RelativeLayout
        android:layout_width="fill_parent"
        android:layout_height="40dp"
        android:background="#FF0000">
    </RelativeLayout>

    <RelativeLayout
        android:layout_width="fill_parent"
        android:layout_height="40dp"
        android:layout_alignParentBottom="true"
        android:background="#FFFF00">
    </RelativeLayout>

</RelativeLayout>

ภาพหน้าจอ

ป้อนคำอธิบายภาพที่นี่


4

ใช้รหัสด้านล่าง จัดตำแหน่งปุ่มให้ชิด มันใช้งานได้ดี

<?xml version="1.0" encoding="utf-8"?>
<LinearLayout xmlns:android="http://schemas.android.com/apk/res/android"
    android:layout_width="match_parent"
    android:layout_height="match_parent"
    android:orientation="vertical" >

    <Button
        android:id="@+id/btn_back"
        android:layout_width="100dp"
        android:layout_height="80dp"
        android:text="Back" />

    <TextView
        android:layout_width="match_parent"
        android:layout_height="0dp"
        android:layout_weight="0.97"
        android:gravity="center"
        android:text="Payment Page" />

    <LinearLayout
        android:layout_width="match_parent"
        android:layout_height="wrap_content" >

        <EditText
            android:layout_width="wrap_content"
            android:layout_height="wrap_content"
            android:layout_weight="1"/>

        <Button
            android:layout_width="wrap_content"
            android:layout_height="wrap_content"
            android:text="Submit"/>
    </LinearLayout>

</LinearLayout>

3

สำหรับกรณีเช่นนี้ให้ใช้ RelativeLayouts เสมอ LinearLayout ไม่ได้มีไว้สำหรับการใช้งานดังกล่าว

<?xml version="1.0" encoding="utf-8"?>
<RelativeLayout
    xmlns:android="http://schemas.android.com/apk/res/android"
    android:id="@+id/db1_root"
    android:layout_width="match_parent"
    android:layout_height="match_parent"
    android:orientation="vertical" >

    <LinearLayout
        android:layout_width="match_parent"
        android:layout_height="match_parent"
        android:orientation="vertical">

        <!-- Place your layout here -->

    </LinearLayout>

    <LinearLayout
        android:layout_width="match_parent"
        android:layout_height="wrap_content"
        android:layout_alignParentBottom="true"
        android:layout_gravity="bottom"
        android:orientation="horizontal"
        android:paddingLeft="20dp"
        android:paddingRight="20dp" >

        <Button
            android:id="@+id/setup_macroSavebtn"
            android:layout_width="0dp"
            android:layout_height="wrap_content"
            android:layout_weight="1"
            android:text="Save" />

        <Button
            android:id="@+id/setup_macroCancelbtn"
            android:layout_width="0dp"
            android:layout_height="wrap_content"
            android:layout_weight="1"
            android:text="Cancel" />

        </LinearLayout>

</RelativeLayout>

2

ใช้ในของคุณandroid:layout_alignParentBottom="true" <RelativeLayout>

สิ่งนี้จะช่วยได้อย่างแน่นอน


1
นั่นหมายความว่าผู้ใช้ต้องการใช้ RelativeLayout
IgorGanapolsky

2

ในกรณีที่คุณมีลำดับชั้นดังนี้:

<ScrollView> 
  |-- <RelativeLayout> 
    |-- <LinearLayout>

ครั้งแรกที่ใช้android:fillViewport="true"ไปScrollViewแล้วใช้ไปandroid:layout_alignParentBottom="true"LinearLayout

สิ่งนี้ใช้ได้สำหรับฉันอย่างสมบูรณ์แบบ

<ScrollView
    android:layout_height="match_parent"
    android:layout_width="match_parent"
    android:scrollbars="none"
    android:fillViewport="true">
    <RelativeLayout
        android:layout_width="match_parent"
        android:layout_height="wrap_content">
        <LinearLayout
            android:orientation="horizontal"
            android:layout_width="match_parent"
            android:layout_height="wrap_content"
            android:gravity="center"
            android:id="@+id/linearLayoutHorizontal"
            android:layout_alignParentBottom="true">
        </LinearLayout>
    </RelativeLayout>
</ScrollView>

2

คุณก็สามารถให้มุมมองของเด็กด้านบนของคุณ (TextView @ + ID / TextView ) android:layout_weight="1"แอตทริบิวต์:

สิ่งนี้จะบังคับองค์ประกอบอื่น ๆ ทั้งหมดให้อยู่ด้านล่าง


2

ซึ่งสามารถทำได้ด้วยเค้าโครงแบบเส้นตรงเช่นกัน

เพียงระบุความสูง = 0dp และน้ำหนัก = 1 ให้กับเค้าโครงด้านบนและสิ่งที่คุณต้องการที่ด้านล่าง เพียงเขียนความสูง = ห่อเนื้อหาและไม่มีน้ำหนัก

มันให้เนื้อหาการตัดคำสำหรับเค้าโครง (รายการที่มีข้อความและปุ่มแก้ไขของคุณ) จากนั้นเนื้อหาที่มีน้ำหนักจะใช้ส่วนที่เหลือของเค้าโครง

ฉันค้นพบสิ่งนี้โดยบังเอิญ


0

ฉันใช้วิธีการของ Janusz ที่โพสต์ แต่ฉันเพิ่มการเติมไปที่มุมมองสุดท้ายเนื่องจากส่วนบนสุดของเค้าโครงของฉันคือ ScrollView

ScrollView จะถูกซ่อนบางส่วนเมื่อมันเติบโตขึ้นพร้อมกับเนื้อหา การใช้android:paddingBottomที่มุมมองสุดท้ายช่วยแสดงเนื้อหาทั้งหมดใน ScrollView

โดยการใช้ไซต์ของเรา หมายความว่าคุณได้อ่านและทำความเข้าใจนโยบายคุกกี้และนโยบายความเป็นส่วนตัวของเราแล้ว
Licensed under cc by-sa 3.0 with attribution required.